We are very pleased to announce the release of Redis extension version 2.0.10.
In this version \yii\redis\Connection::$retryInterval was added. It speficifies wait time between retry in microseconds.
See the CHANGELOG for details.
We are very pleased to announce the release of Redis extension version 2.0.10.
In this version \yii\redis\Connection::$retryInterval was added. It speficifies wait time between retry in microseconds.
See the CHANGELOG for details.
Debug extension version 2.1.10 was released. It is tweaking Logs panel not to wrap important columns text and to display arrows in less distracting manner.
See the CHANGELOG for details.
We are very pleased to announce the release of Yii Framework version 2.0.29. Please refer to the instructions at https://www.yiiframework.com/download/ to install or upgrade to this version.
Version 2.0.29 is a minor release of Yii 2.0. Additionally to fixing minor bugs it adds PostgreSQL 12 support (including partitioned tables) and adjusts dependency injection container syntax to be closer to what is used in Yii 3:
'__construct()' => ['ConstructorArg1', 'ConstructorArg2']'__class' => SomeClass::classInstance::of() is now allowed in definitions ('SomeInterface' => Instance::of('SomeService')) and $container->get(Instance::of('SomeInterface')'SomeInterface' => [SomeFactory::class, 'createMethod']Current Yii 2 syntax works as it did so it is not necessary to update your configuration.
Thanks to all Yii community members who contribute to the framework, translators who keep documentation translations up to date and community members who answer questions at forums.
There are many active Yii communities so if you need help or want to share your experience, feel free to join them.
A complete list of changes can be found in the CHANGELOG.
This extension provides support for ActiveRecord MultiTenant.


The preferred way to install this extension is through composer.
Either run
php composer.phar require --prefer-dist solutosoft/yii-multitenant
or add
"solutosoft/yii-multitenant": "*"
tenant_id column:class m191023_101232_create_post extends Migration
{
/**
* {@inheritdoc}
*/
public function up()
{
$this->createTable('post', [
'id' => $this->primaryKey(),
'title' => $this->string()->notNull(),
'category_id' => $this->integer(),
'content' => $this->string()
'tenant_id' => $this->integer(),
]);
$this->createTable('category', [
'id' => $this->primaryKey(),
'name' => $this->string()->notNull(),
'tenant_id' => $this->integer(),
]);
}
}
TenantInterface to user model:use solutosoft\multitenant\MultiTenantRecord;
class User extends MultiTenantRecord implements IdentityInterface, TenantInterface
{
/**
* {@inheritdoc}
*/
public function getTenantId()
{
return // logic to determine tenant from current user
}
/**
* Finds user by username attribute
* This is an example where tenant filter is disabled
*/
public static function findByUsername($username)
{
return static::find()->withoutTenant()->where(['username' => $username]);
}
...
}
tenant_id attribute from MultiTenantRecord intead of ActiveRecord: use solutosoft\multitenant\MultiTenantRecord;
class Post extends MultiTenantRecord
{
...
}
class Category extends MultiTenantRecord
{
...
}
Now when you save or execute some query the tenant_id column will be used. Example:
// It's necessary the user will be logged in

$posts = \app\models\Post::find()->where(['category_id' => 1])->all();
// SELECT * FROM `post` WHERE `category_id` = 1 and `tenant_id` = 1;

$category = \app\models\Category([
  'name' => 'framework'
]);
$category->save();
// INSERT INTO `category` (`name`, `tenant_id`) values ('framework', 1);
Autocompletion generator for custom components in Yii2.


![]()
[English documentation] [[Документация на русском](README.RU.md)]
By default in Yii2 not working autocompletion for custom components. IDE sees no added components and this causes inconvenience in operation.
This extension allows you to automatically generate a file with the autocomplete PHPDoc blocks with which the IDE will recognize all of the components in the application configuration.
Using Composer:
composer require "iiifx-production/yii2-autocomplete-helper"
After installation, you need to one-time set up component to work.
For Yii2 Basic, in @app/config/console.php:
`php
'bootstrap' => ['log', 'autocomplete'],
'components' => [
    'autocomplete' => [
        'class' => 'iiifx\Yii2\Autocomplete\Component',
    ],
    # ...
]
For Yii2 Advanced, in **@console/config/main.php**:
```php
    'bootstrap' => ['log', 'autocomplete'],
    'components' => [
        'autocomplete' => [
            'class' => 'iiifx\Yii2\Autocomplete\Component',
        ],
        # ...
    ]
To generate autocompletion in the console:
`bash
php yii ide-components
`
Generator automatically detects the type of application, read all configuration files and generate the autocomplete file to the application root.
`bash
Yii2 IDE auto-completion helper
Vitaliy IIIFX Khomenko, 2019
Success: /home/iiifx/Projects/myProject/_ide_components.php
`
Important: For IDE did not swear on the two copies of the Yii class must be main Yii class file marked as a text document - example.
The main class is located on the way: @vendor/yiisoft/yii2/Yii.php
Sometimes the structure of the application differs from the standard and the need to change the generator behavior.
The following are examples of possible configuration options.
If you need to change the name of a autocomplete to another, it is quite simple:
`php
'bootstrap' => ['log', 'new-component-name'], # <-- new component name
'components' => [
    'new-component-name' => [ # <-- new component name
        'class' => 'iiifx\Yii2\Autocomplete\Component',
    ],
    # ...
]
When the generator run in the console you need to pass the correct component name:
```bash
php yii ide-components --component=new-component-name
By default, a generator start is only possible for YII_ENV = "dev" environment.
You can change the environment:
`php
'bootstrap' => ['log', 'autocomplete'],
'components' => [
    'autocomplete' => [
        'class' => 'iiifx\Yii2\Autocomplete\Component',
        'environment' => 'local', # <-- environment
    ],
    # ...
]
### Changing the generator controller

By default, the generator uses a console controller to create autocompletion.

You can replace the default controller, extend it, or add your own implementation:
```php
    'bootstrap' => ['log', 'autocomplete'],
    'components' => [
        'autocomplete' => [
            'class' => 'iiifx\Yii2\Autocomplete\Component',
            'controllerMap' => [
                'ide-components' => 'iiifx\Yii2\Autocomplete\Controller', # <-- default controller
                'my-custom-generator' => 'path\to\your\custom\Controller', # <-- your controller
            ],
        ],
        # ...
    ]
Now you can run your controller:
`bash
php yii my-custom-generator
`
Link to the controller by default: source/Controller.php.
By default, autocompletion file will be named _ide_components.php and will be placed in the application root.
You can change the name and location of the file:
`php
'bootstrap' => ['log', 'autocomplete'],
'components' => [
    'autocomplete' => [
        'class' => 'iiifx\Yii2\Autocomplete\Component',
        'result' => '@app/new-file-name.php' # <-- name and path
    ],
    # ...
]
The file path must be relative to aliases framework. Example: **@common/../new-file-name.php**.

### Special configuration files

Sometimes you need to manually specify the application configuration files from which you want to generate autocompletion.

In this case, the generator will not seek configuration, the generator immediately uses this list.

For Yii2 Advanced:
```php
    'bootstrap' => ['log', 'autocomplete'],
    'components' => [
        'autocomplete' => [
            'class' => 'iiifx\Yii2\Autocomplete\Component',
            'config' => [
                '@common/config/main.php', # <-- config list
                '@common/config/main-local.php',
                '@console/config/main.php',
                '@console/config/main-local.php',
                '@backend/config/main.php',
                '@backend/config/main-local.php',
                '@frontend/config/main.php',
                '@frontend/config/main-local.php',
            ],
        ],
        # ...
    ]
For Yii2 Basic:
`php
'bootstrap' => ['log', 'autocomplete'],
'components' => [
    'autocomplete' => [
        'class' => 'iiifx\Yii2\Autocomplete\Component',
        'config' => [
            '@app/config/console.php', # <-- config list
            '@app/config/web.php',
        ],
    ],
    # ...
]
### Configuration groups

In big projects sometimes need to be able to generate different autocomplete files depending on the stage of development.

You can group configuration files and generate autocompletion only for a specific group.
```php
    'bootstrap' => ['log', 'autocomplete'],
    'components' => [
        'autocomplete' => [
            'class' => 'iiifx\Yii2\Autocomplete\Component',
            'config' => [
                'frontend' => [
                    '@common/config/main.php', # <-- frontend group
                    '@common/config/main-local.php',
                    '@frontend/config/main.php',
                    '@frontend/config/main-local.php',
                ],
                'backend' => [
                    '@common/config/main.php', # <-- backend group
                    '@common/config/main-local.php',
                    '@backend/config/main.php',
                    '@backend/config/main-local.php',
                ],
                'api' => [
                    '@common/config/main.php', # <-- api group
                    '@common/config/main-local.php',
                    '@common/../api/config/main.php',
                    '@common/../api/config/main-local.php',
                ],
            ],
        ],
        # ...
    ]
Now you can generate autocompletion for the desired group:
`bash
php yii ide-components --config=api
`
Yii2 extension for the the Tourist component: https://github.com/IGreatlyDislikeJavascript/bootstrap-tourist
The Tourist component is a fork of Bootstrap Tour: https://github.com/sorich87/bootstrap-tour
This extension reuses code from the yii2-bootstrap-tour extension: https://github.com/MyCademy/yii2-bootstrap-tour
The preferred way to install this extension is through composer.
Either run
php composer.phar require --prefer-dist luc1/yii2-tourist "*"
or add
"luc1/yii2-tourist": "*"
to the require section of your composer.json file.
class AppAsset extends yii\web\AssetBundle
{
    public $depends = [
        // other dependencies
        'luc\tourist\TouristAsset'
    ];
}
Once the extension is installed, simply use it in your code by :
use luc\tourist\Tourist;

<?= Tourist::widget::widget(
    'clientOptions' => [ //Bootstrap Tour Options, see: http://bootstraptour.com/api/
        'steps' => [
            [
                'element' => "#element1",
                'title' => "Step 1",
                'content' => "Content of my step 1",
            ],
            [
                'element' => "#element2",
                'title' => "Step 2",
                'content' => "Content of my step 2",
            ],
        ],
    ]);
?>


Этот файл так же доступен на русском языке.
This simple extension helps to show nice notifications in browser. It use svg icons and can be customised by overwriting base CSS styles.

Just run:
`bash
$ composer require floor12/yii2-notification
or add this to the require section of your composer.json.json
"floor12/yii2-notification": "dev-master"
`
To include js and css files, add floor12\notification\NotificationAsset as dependency in your AppAsset:
use floor12\notification\NotificationAsset;
use yii\web\AssetBundle;

class AppAsset extends AssetBundle
{
    ...
    public $depends = [
        NotificationAsset::class
    ];
}
To show notification in browser just pass message text to one of the f12notification object methods:
f12notification.info(text);    //information message;
f12notification.success(text); //success message;
f12notification.error(text);   //error message;
For example:
if (userSucces == true)
  f12notification.success('Registration success'.)
else
  f12notification.error('Registration failed.')
Its also possible to show notifications by passing message text to one of the floor12\notification\Notification methods:
use floor12\notification\Notification;

Notification::info('The form is loading...');
Notification::error('Pleas fill all required fields');
Notification::success('This model is saved');
In case if using PHP api, NotificationAsset will be included in your app by Notification class.


Automates file uploading for every attribute tagged with file or image validation rule. It also configures the way that filename should be renamed and stored in database as attribute value.
The preferred way to install this extension is through composer.
Either run
php composer.phar require --prefer-dist daxslab/yii2-uploader-behavior "*"
or add
"daxslab/yii2-uploader-behavior": "*"
to the require section of your composer.json file.
Once the extension is installed, simply use it in your models by :
use daxslab/behaviors/UploaderBehavior;

public function behaviors() {
    return [
        UploaderBehavior::className()
    ];
}
This is the simplest way of usage. It will look for all attributes with a file or image validation rule.
public function rules()
{
    return [
        [['name'], 'required'],
        [['name'], 'string', 'max' => 256],
        [['image'], 'image', 'skipOnEmpty' => true],
    ];
}
And update the form to specify a file input for the image attribute:
$form->field($model, 'image')->fileInput();
For a more controlled usage, you can specify which attributes to control using the attributes option as in :
use daxslab/behaviors/UploaderBehavior;

public function behaviors() {
    return [
        [
            'class' => UploaderBehavior::className(),
            'attributes' => ['avatar'] // or you can use the string format as in 'attributes' => 'avatar'
        ]
    ];
}
By default the filename of the uploaded file is randomized, but if you want to configure it you can setup the renamer
option:
use daxslab/behaviors/UploaderBehavior;

public function behaviors() {
    return [
        [
            'class' => UploaderBehavior::className(),
            'attributes' => ['avatar'] // or you can use the string format as in 'attributes' => 'avatar'
            'renamer' => UploaderBehavior::RENAME_MD5 //will encode the filename with md5()
        ]
    ];
}
also you can specify a custom function to rename the filename:
use daxslab/behaviors/UploaderBehavior;

public function behaviors() {
    return [
        [
            'class' => UploaderBehavior::className(),
            'attributes' => ['avatar'] // or you can use the string format as in 'attributes' => 'avatar'
            'renamer' => function($name, $owner){
                return strtoupper($name); //will turn the filename into uppercase
            }
        ]
    ];
}
Proudly made by Daxslab.


Extension to help setup the standard HTML meta tags besides the ones defined by Opengraph and TwitterCard to contribute to website SEO
The preferred way to install this extension is through composer.
Either run
php composer.phar require --prefer-dist daxslab/yii2-taggedview "*"
or add
"daxslab/yii2-taggedview": "*"
to the require section of your composer.json file.
Configure the View component into the main configuration file of your application:
'components' => [
    //...
    'view' => [
        'class' => 'daxslab\taggedview\View',
        //configure some default values that will be shared by all the pages of the website
        //if they are not overwritten by the page itself
        'image' => 'http://domain.com/images/default-image.jpg',
    ],
    //...
]
The component will try to set some properties by default:
$this->site_name = Yii::$app->name;
$this->url = Yii::$app->request->baseUrl;
$this->locale = Yii::$app->language;
You can overwrite the content of this tags in every page or in the component configuration.
Once the extension is configured, simply use it in your views by:
<?php
    $this->title = 'page title';
    $this->description = 'page description';
    $this->keywords = ['keywords', 'for', 'this', 'page'];
    $this->image = 'http://domain.com/images/page-image.jpg';
?>
Proudly made by Daxslab.


Yii2 component to generate image thumnails of any size.
The preferred way to install this extension is through composer.
Either run
php composer.phar require --prefer-dist daxslab/yii2-thumbnailer "*"
or add
"daxslab/yii2-thumbnailer": "*"
to the require section of your composer.json file.
The basic configuration only requires adding the component to the application:
'components' => [
    //...
    'thumbnailer' => [
        'class' => 'daxslab\thumbnailer\Thumbnailer',
    ],
    //...
]
Besides that a default value is always provided, all the options can be configured.
'components' => [
    //...
    'thumbnailer' => [
        'class' => 'daxslab\thumbnailer\Thumbnailer',
        'defaultWidth' => 500,
        'defaultHeight' => 500,
        'thumbnailsBasePath' => '@webroot/assets/thumbs',
        'thumbnailsBaseUrl' => '@web/assets/thumbs',
        'enableCaching' => true, //defaults to false but is recommended
    ],
    //...
]
Once the extension is configured, simply use it in your views by:
//Generates thumbnail with default values specified in the configuration
Html::img(Yii::$app->thumbnailer->get($imageUrl));

//Generates a 400px width thumbnail. The height is determined as the width because is not set.
Html::img(Yii::$app->thumbnailer->get($imageUrl, 400));

//Generates a 400x400 pixels thumbnail and 60% quality
Html::img(Yii::$app->thumbnailer->get($imageUrl, 400, 400));

//Generates a 400x400 pixels thumbnail and 10% quality
Html::img(Yii::$app->thumbnailer->get($imageUrl, 400, 400, 10));

//Generates a 400x400 pixels thumbnail, 10% quality and not cropping the image
//but inserting it into a box with the specified dimensions.
Html::img(Yii::$app->thumbnailer->get($imageUrl, 400, 400, 10, ManipulatorInterface::THUMBNAIL_INSET));
Proudly made by Daxslab.


Yii2 widget to include the Facebook widget for comments in views.
The preferred way to install this extension is through composer.
Either run
php composer.phar require --prefer-dist daxslab/yii2-facebookcomments-widget "*"
or add
"daxslab/yii2-facebookcomments-widget": "*"
to the require section of your composer.json file.
Once the extension is installed, simply use it in your views by :
<?= \daxslab\facebook\CommentsBox::widget([
    'appId' => 'MY_FACEBOOK_APP_ID', //defaults to Yii::$app->paramss['facebook_app_id']
    'numPosts' => 10 //defaults to 5
]); ?>


Этот файл так же доступен на русском языке.
This is a component for generate some Meta, Open Graph and Twitter-card tags in a template header of Yii2 app.
This is a list of supported tags:
Just run:
`bash
$ composer require floor12/yii2-metamaster
or add this to the require section of your composer.json.json
"floor12/yii2-metamaster": "dev-master"
`
After that, include some basic metamaster data into components section of application config.
`php
'components' => [
    'metamaster' => [
        'class' => 'floor12\metamaster\MetaMaster',
        'siteName' => 'My cool new Web Site',
        'defaultImage' => '/design/export_logo.png',
    ],
...
Attributes:
1. `siteName` - name of project to show in Open Graph tags;
2. `defaultImage` - web relative path to default image for Open Graph tags;
3. `web` - yii2 alias to web path to read image width and height for Open Graph tags (default is `@app/web`)


Usage
------------

Its possible to use in any place of your app. Just use setters and then call the `register(View $view)` method with View object passed into it.

Allowed setters:
```php
Metamaster::setSiteName(string $value)
Metamaster::setTitle(string $value)
Metamaster::setUrl(string $value)
Metamaster::setType(string $value)
Metamaster::setDescription(string $value)
Metamaster::setImage(string $relativePath, string $absolutePath = null)
For example, using in controller:
public function actionIndex()
   {
        Yii::$app->metamaster
                   ->setTitle("This is test page")
                   ->setDescription("This is page description")
                   ->setImage('/images/article/image.png')
                   ->register(Yii::$app->getView());

        return $this->render('index');
    }
It will generate all you need in template:
`html
`
This extension provides a GeoNames management solution for Yii framework 2.0, containing import scripts and a CRUD UI.
It is an adaption of the Laravel / Lumen / Eloquent Geonames scripts at https://github.com/yurtesen/geonames
For license information check the LICENSE-file.
The preferred way to install this extension is through composer.
Either run
composer require --prefer-dist diggindata/yii2-geonames:dev-master
or
php composer.phar require --prefer-dist diggindata/yii2-geonames
or add
"diggindata/yii2-geonames": "@dev"
to the require section of your composer.json, then run
composer install
We need a folder to store downloaded data files from geonames.org.
So in your application's base directory, create the directories data and data/geonames.
This directory will hold the downloaded data files from geonames.org.
Add following lines to both, your web and your console configuration file to enable this module (config/web.php and config/console.php):
    ...
    'modules' => [
        ...
        'geonames' => [
            'class' => 'diggindata\geonames\Module',
        ],
    ],
The yii geonames shell command can be configured.
Create a file geonames.php in the config directory of your Yii application.
You may use the file vendoe/diggindata/yii2-geonames/geonames.php.example file as a template.
All available configuration options are listed below with their default values.
string, default: null) ¶string, default: null) ¶boolean, default: true) ¶Yii::getAlias('@app/data') . '/geonames') ¶Array of tables which would be ignored in imports. Some tables might note be used by you, e.g. alternate_names table.
Uncommenting it will stop auto-import.
array, default: array()) ¶Array of 2-Char ISO codes of countries which shall be imported. If the array is empty, the allCountries file is imported.
Finally you need to update your database schema by applying the provided migrations. Make sure that you have properly configured your db application component, then run the following command:
$ php yii migrate/up --migrationPath=@vendor/diggindata/yii2-geonames/src/migrations
By now you should have Yii2-geonames installed. You may now open the geonames module.
You should also be able to import geonames data via the console commqand, see Usagebelow.
Enter the following command within your application's folder:
yii geonames/geonames/download
This will download data files:
[] zip
+--- DE.zip
iso-languagecodes.txt
timeZones.txt
admin1CodesASCII.txt
admin2Codes.txt
countryInfo.txt
DE.zip
featureCodes_en.txt
hierarchy.zip
Enter the following command within your application's folder:
yii geonames/geonames/seed
This will insert the downloaded data into the respective database tables.
-- Add Auto-Increment PK
ALTER TABLE `postalcode`
ADD `id` int NOT NULL AUTO_INCREMENT PRIMARY KEY;

-- Delete duplicates
DELETE t1 FROM postalcode t1
INNER JOIN postalcode t2
WHERE
    t1.id > t2.id AND (
    t1.countryCode = t2.countryCode AND
    t1.postalCode = t2.postalCode AND
    t1.placeName = t2.placeName AND
    t1.admin1Code = t2.Admin1Code AND
    t1.admin2Code = t2.admin2Code AND
    t1.admin3Code = t2.admin3Code AND
    t1.latitude = t2.latitude AND
    t1.longitude = t2.longitude
);

-- Drop Auto-Increment PK
ALTER TABLE postalcode DROP `id`;
Debug extension version 2.1.11 was released. It is adding removal of stale debug data, fixes issues and adding buttons for navigating between requests.
See the CHANGELOG for details.
We are very pleased to announce the release of Auth Client extension version 2.2.5.
In this release deprecated dependency spomky-labs/jose was replaced by JWT Framework.
See the CHANGELOG for details.
We are very pleased to announce the release of Redis extension version 2.0.11.
This version adds for Redis cluster contributed by Robert Hofer.
See the CHANGELOG for details.
Renders a Pell WYSIWYG text editor plugin widget.

The preferred way to install this extension is through composer.
Either run
composer require coderius/yii2-pell-widget:"@dev"
or add
"coderius/yii2-pell-widget" : "@dev"
to the require section of your application's composer.json file.
For example to use the datepicker with a model:
`php
echo Pell::widget([
'model' => $model,
'attribute' => 'text',
]);
`
The following example will used not as an element of form:
`php
echo Pell::widget([
'asFormPart'  => false,
'value'  => $value,
'clientOptions' =>[
    'onChange' => new JsExpression(
        "html => {
            console.log(html);
        },"
    )
]
]);
`
You can also use this widget in an ActiveForm using the widget() method, for example like this:
use coderius\pell\Pell;

<?= $form->field($model, 'text')->widget(Pell::className(), []);?>
Please, remember that if you are required to add javascript to the configuration of the js plugin and is required to be
plain JS, make use of JsExpression. That class was made by Yii for that specific purpose. For example:
// Having the following scenario
<script>
    function jsFunctionToBeCalled() {
        // ...
    }
</script>

<?= $form->field($model, 'content')->widget(Pell::className(), [
        'clientOptions' => [
            'defaultParagraphSeparato' => 'div',

            // ...

            'actions' => [
                'bold',
                'italic',
                'underline',
                'strikethrough',
                'heading1',
                'heading2',
                'paragraph',
                'quote',
                'olist',
                'ulist',
                'code',
                'line',
                'link',
                'image',
                [
                    'name'   => 'backColor',
                    'icon'   => '<div style="background-color:pink;">A</div>',
                    'title'  => 'Highlight Color',
                    // this will render the function name without quotes on the configuration options of the plugin
                    'result' => new JsExpression('jsFunctionToBeCalled')
                ],
            ],

            // ...
        ]

    ]
]); ?>
Please see Examples usage in yii2 view files for details.
$ phpunit
Please, check the Pell plugin github documentation for further information about its configuration options.
Please see CONTRIBUTING for details.
The MIT License (MIT). Please see License File for more information.
Web development has never been so fun!
coderius.biz.ua


Этот файл доступен на русском языке.
This module was designed to solve the problem of creating file fields in ActiveRecord models of the Yii2 framework. The main components of the module are:
floor12\files\components\FileBehaviour - behavior that must be connected to the ActiveRecord model;floor12\files\components\FileInputWidget - an InputWidget that allows you to add, edit and generally work with files;floor12\files\components\FileListWidget - an additional widget to display a list of files with the abilities to view images in
the Lightbox2 gallery, download all files of the current field in zip format, and view the Word and Excel files using the Microsoft
office online.FileValidator defined in the rules ()section;FileInputWidget widget will automatically open a modal window to crop the image with the desired ratio);FileInputWidget supports changing of files order by drag-and-drop, cropping and filename updating;FileCreateFromInstance and FileCreateFromPath with helps add files to AR
model from server file system; At this stage, the module supports the following languages:
All files data is stored in the file table. The file model relay to the model by three fields:
class - the full class name of the relay modelfield - the name of the model fieldobject_id - primary key of the modelWhen file added to the form, it uploads to server in background where all processing takes place.
As a result of this processing, it is written to disk and a new entry is created for it in the file table, with the fields class and
field filled with data from the model, and object_id is empty and will assign only after saving the ActiveRecord model.
When a file is deleted from the widget, it is not deleted from the disk and the file table, just obejct_id equals to 0.
You can use the console command files / console / clean to periodically clean up this kind of orphan files.
## Install and setup
To add this module to your app, just run:
`bash
$ composer require floor12/yii2-module-files
or add this to the `require` section of your composer.json.
json
"floor12/yii2-module-files": "dev-master"
`
Then execute a migration to create file table.
`bash
$ ./yii migrate --migrationPath=@vendor/floor12/yii2-module-files/src/migrations/
`
After that, include module data in modules section of application config:
`php
'modules' => [
         'files' => [
             'class' => 'floor12\files\Module',
             'storage' => '@app/storage',
             'cache' => '@app/storage_cache',
             'token_salt' => 'some_random_salt',
         ],
     ],
 ...
`
Parameters to set:
storage - the path alias to the folder to save files and image sources, by default it is located in the storage folder in the
project root;cache - path alias to the folder of thumbnails of images that the module creates on the fly upon request and caches;token_salt - a unique salt to generate InputWidget tokens.
To add one or more files fields to the ActiveRecord model, you need to connect floor12\files\components\FileBehaviour to it
and pass list the field names that will store the files in the model. For example, for the User model, 2 file fields are defined here
: avatar and documents:
`php
public function behaviors()
{
return [
    'files' => [
        'class' => 'floor12\files\components\FileBehaviour',
        'attributes' => [
            'avatar',
            'documents'
        ],
    ],
    ...
To have nice attribute labels in forms, add some labels to `attributeLabels()`:
php
public function attributeLabels()
{
   return [
       ...
       'avatar' => 'Аватар',
       'documents' => 'Документы',
       ...
   ];
}
`
Setup validation rules in the rules() method of ActiveRecord model:
`php
public function rules()
{
 return [
     // Avatar is required attribute
     ['avatar', 'required'],

     // Avatar allow to uploade 1 file with this extensions: jpg, png, jpeg, gif
     ['avatar', 'file', 'extensions' => ['jpg', 'png', 'jpeg', 'gif'], 'maxFiles' => 1],

     // Documens allows to upload a few files with this extensions: docx, xlsx
     ['documents', 'file', 'extensions' => ['docx', 'xlsx'], 'maxFiles' => 10],
 ...
`
### Work with files
If maxFiles in FileValidator equals to 1, this attribute will store an floor12\files\models\File object.
Example:
`php
// The href field contains web path to file source
echo Html::img($model->avatar->href)
// __toString() method of File object will return href as well
echo Html::img($model->avatar) `
If the file is image, getPreviewWebPath method returns a web path to image thumbnail. By default thumbnail created with the jpeg or png format, it depends to source file. But also WEBP option is available.
File::getPreviewWebPath(int $width = 0, int $height = 0 ,bool $webp = false)
Usage example:
`php
// User avatar thumbnail with 200px width
echo Html::img($model->avatar->getPreviewWebPath(200));
// User avatar thumbnail with 200px width and WEBP format echo Html::img($model->avatar->getPreviewWebPath(200, 0, true));
// User avatar thumbnail with 300px height and WEBP format
echo Html::img($model->avatar->getPreviewWebPath(0, 300, true)); `
When maxFiles equals to 1, multiple upload is available. In this case, model field will contains an array if floor12\files\models
\File objects:
`php
foreach ($model->docs as $doc}
Html::a($doc->title, $doc->href);
`
Here is another example, the advanced usage of thumbnails. In this case, we use modern picture and source tags, as well as media
queries. As a result, we have 8 different thumbnails: 4 has webp format for those browsers that support this it, and 4 has jpeg format.
Devices with retina displays will get an images with double resolution, regular screens have regular sized pictures. This example
also uses different images widths at different screen widths (just as example of mobile/desktop image switching):
`php
 <source type="image/webp" media='(min-width: 500px)' srcset="
                          <?= $model->poster->getPreviewWebPath(150, 0, 1) ?> 1x,
                          <?= $model->poster->getPreviewWebPath(300, 0, 1) ?> 2x">
 <source type="image/webp" media='(max-width: 500px)' srcset="
                          <?= $model->poster->getPreviewWebPath(350, 0, 1) ?> 1x,
                          <?= $model->poster->getPreviewWebPath(700, 0, 1) ?> 2x">
 <source type="image/jpeg" media='(min-width: 500px)' srcset="
                          <?= $model->poster->getPreviewWebPath(150, 0, 0) ?> 1x,
                          <?= $model->poster->getPreviewWebPath(300, 0, 0) ?> 2x">
 <img src="<?= $model->poster->getPreviewWebPath(150) ?>"
      srcset="
            <?= $model->poster->getPreviewWebPath(350) ?> 1x,
            <?= $model->poster->getPreviewWebPath(700) ?> 2x"
      alt="<?= $model->title ?>">
`
### Listing the files There is a widget for listing all files. It supports Lightbox2 gallery to display images and MS Office files preview. Its also supports downloading of the all the files attached to the field in a ZIP-archive.
`php
echo \floor12\files\components\FileListWidget::widget([
 'files' => $model->docs,
 'downloadAll' => true,
 'zipTitle' => "Documents of {$user->fullname}"
])
`
An array of File objects must be passed to the widget files field. Also additional parameters available:
title - optionally set the title of the block (by default its taken from AttributeLabels())",downloadAll - show the "download all" button,zipTitle - set the file name of zip archive,passFirst - skip first file in array (it is often necessary to display the gallery without the first picture. For example, in the
news view page, when the first image used to be news main image).
### InputWidget for ActiveFrom
To display files block in your forms use the floor12\files\components\FileInputWidget:
`php
<?= $form->field($model, 'avatar')->widget(floor12\files\components\FileInputWidget::class) ?>
`
Moreover, if maxFiles parameter in FileValidator equals to 1 or more, FileInputWidget will
take the necessary form to load one file or several at once. If necessary, you can pass uploadButtonText and uploadButtonClass parameters to the widget.
I will be glad of any help in the development, support and bug reporting of this module.


Этот файл доступен на русском языке.
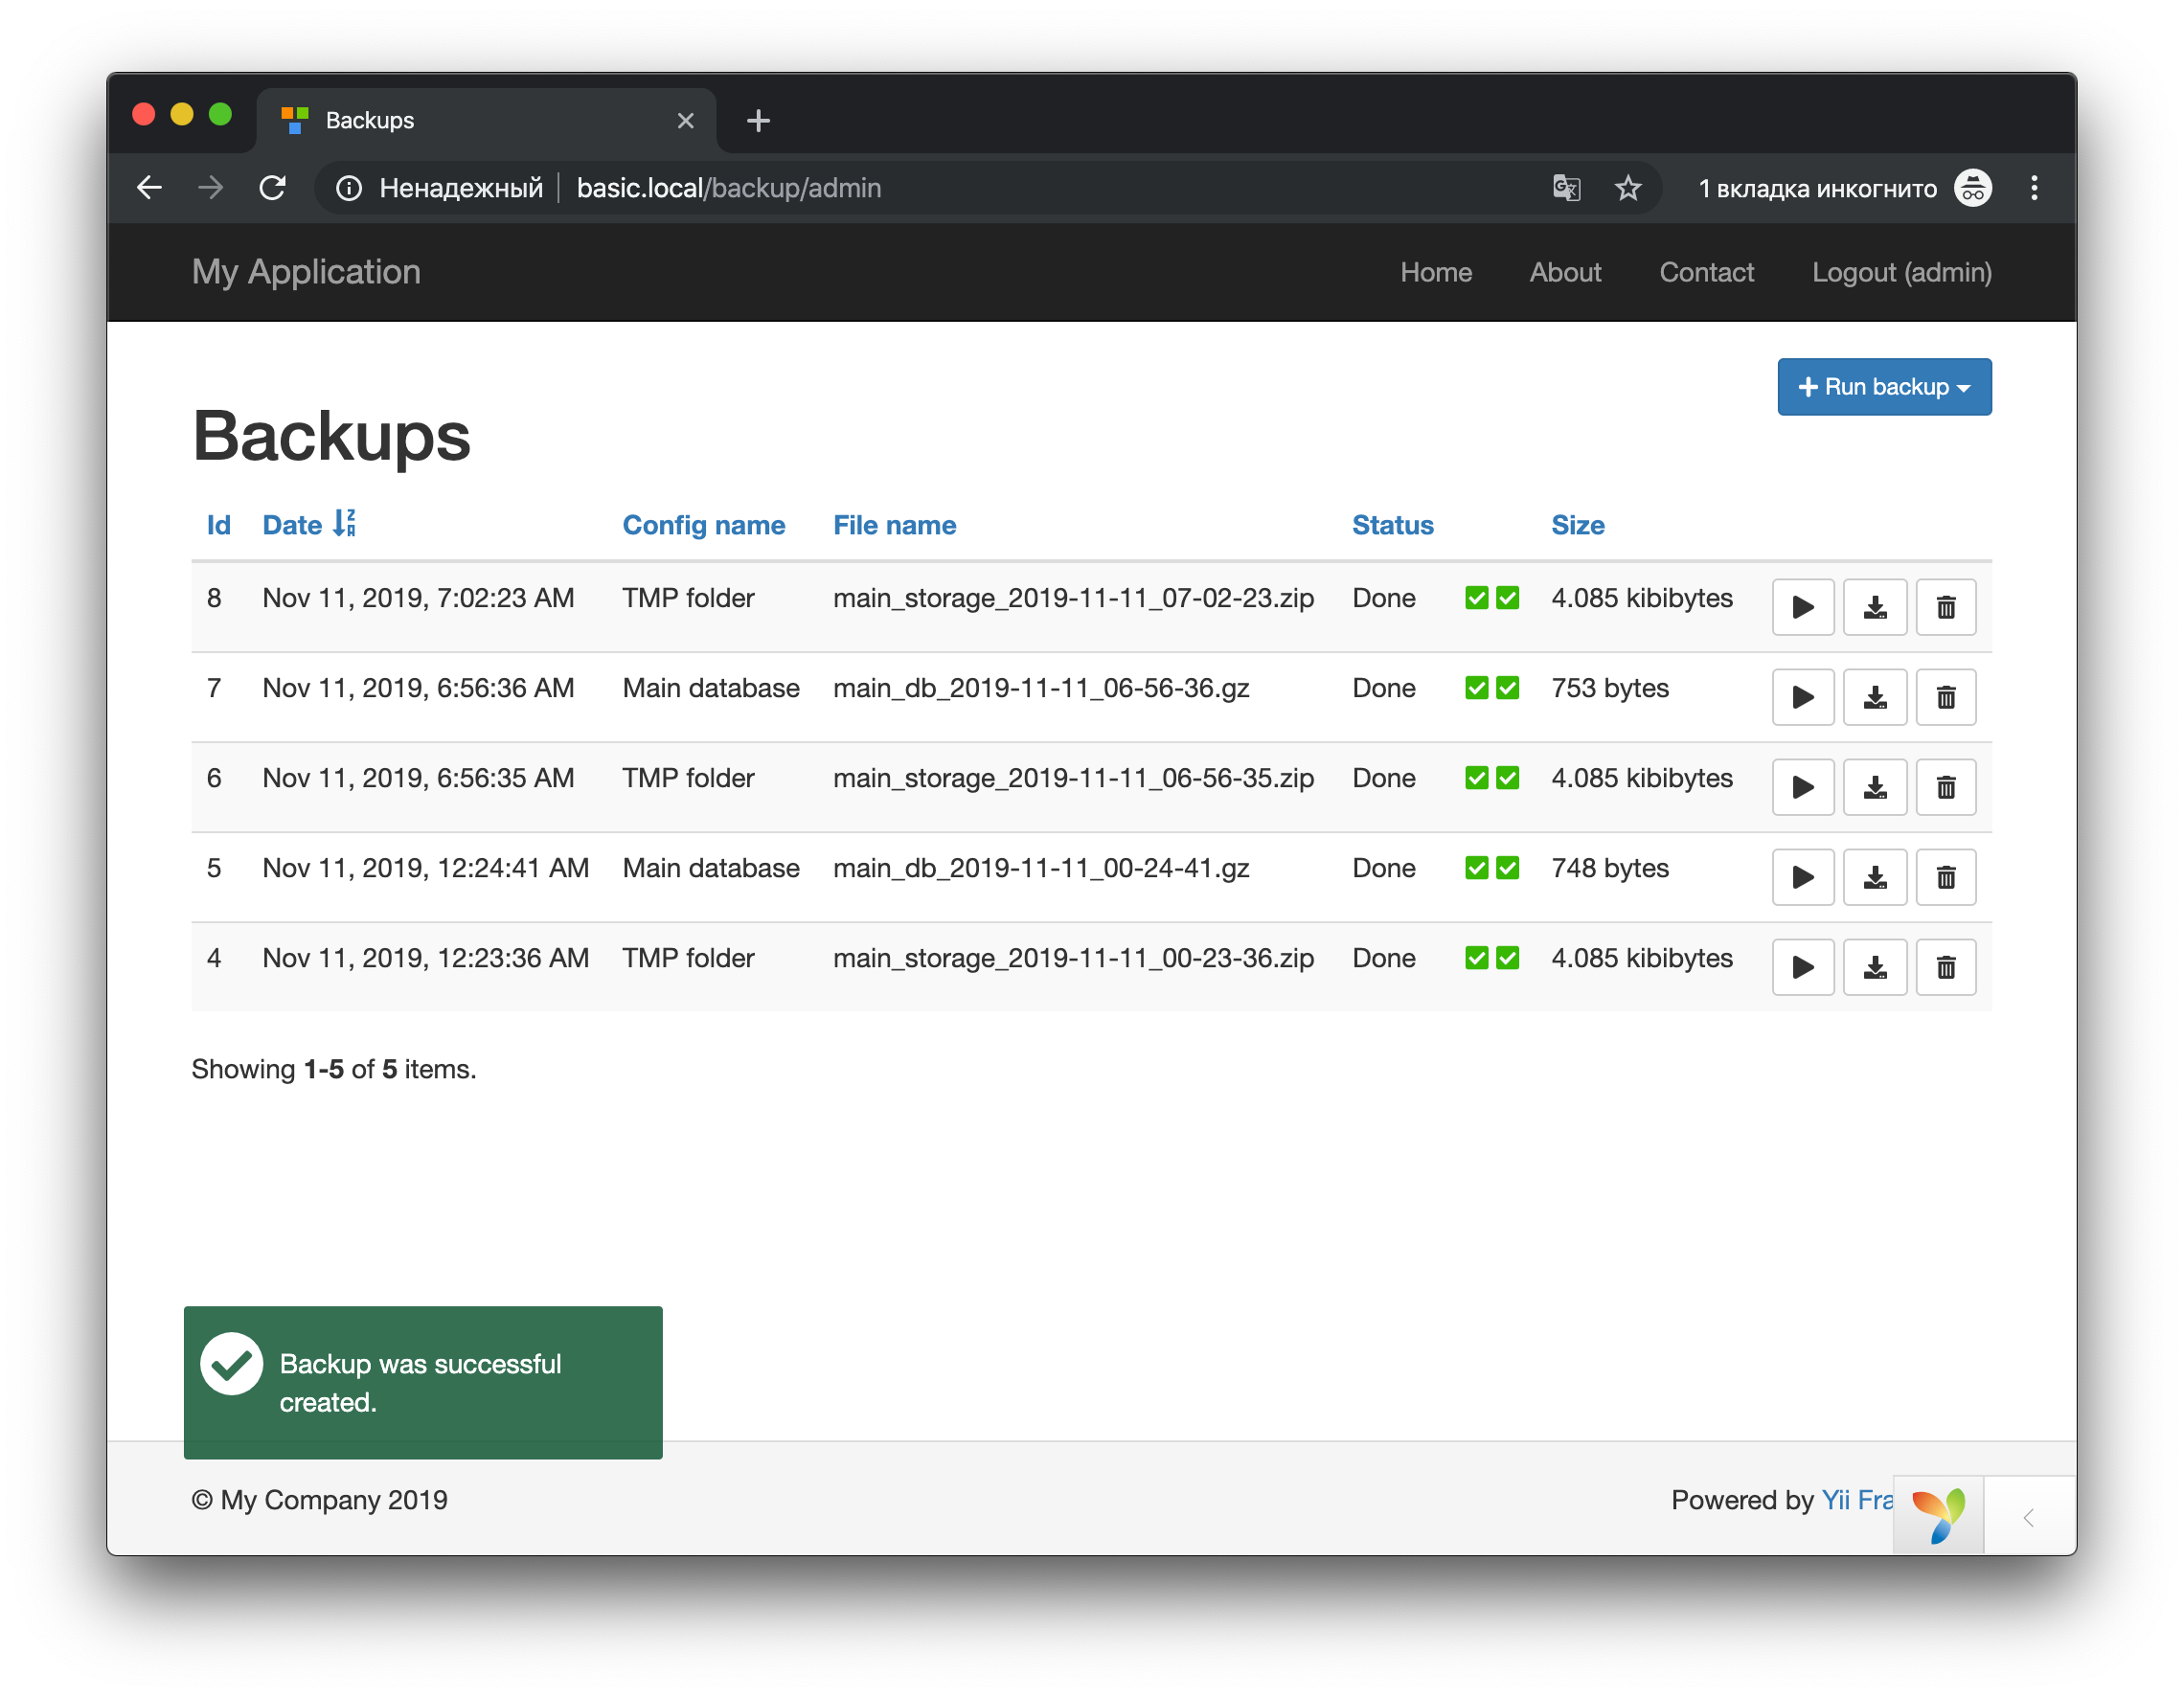
This module helps to create and restore backups of databases and files stored on disk. It has web-interface, console commands, and REST-API for remote control. It also supports io-priority settings and has flexible configuration options. To work independent of the application database, this module uses its sqlite database in the backup folder.
Now, this module supports English and Russian languages.
To add this module to your app, just run:
`bash
$ composer require floor12/yii2-module-backup
or add this to the `require` section of your composer.json.
json
"floor12/yii2-module-backup": "dev-master"
`
After that, include minimal module configuration in modules section of application config:
`php
'modules' => [
         'backup' => [
             'class' => 'floor12\backup\Module',
             'administratorRoleName' => '@',
             'configs' => [
                 [
                     'id' => 'main_db',
                     'type' => BackupType::DB,
                     'title' => 'Main database',
                     'connection' => 'db',
                     'limit' => 10
                 ],
                 [
                     'id' => 'main_storage',
                     'type' => BackupType::FILES,
                     'title' => 'TMP folder',
                     'path' => '@app/tmp',
                     'limit' => 2
                 ]
             ]
         ]
         ],
     ],
 ...
`
These parameters is possible to set up:
administratorRoleName - role to access web controllerbackupFolder - path alias to the place where backups are stored (default is @app/backups)chmod - if this param has value, the new backup file will change mode after creationauthTokens - array of auth tokens to use REST-API of the moduleionice - the value of this param will be placed before ZIP console command in case of disk backup (for example it's possible to put
iotince
 -c3
inside this param to run backup creation with IDLE disk i/o priority)adminLayout - it will change default main layout to something you need (if your admin panel has different base layout) And the main and required param isconfigs - its an array of your backup items (folders and databases).
Each backup items mast have this elements to set:
id - backup identifier, contains only letters and numbers without spacetype - type backup: disk or databasetitle - human-readable backup item title to show in the admin interfacelimit - how many backup copies keep before delete (0 - never delete old copies)connection - in case of database backup, connection name in Yii2 config path - in case of disk backup, the path to store backup files
This module has a web controller to work with backups. Go to backup/admin or backup/admin/index to create, delete, restore and download
backups.
### Console interface
To list all existing backups run
`bash
$ ./yii backup/console/index>
`
To create config run
`bash
$ ./yii backup/console/create `
backup_config_id is backup item identifier from module configuration.
To restore config run
`bash
$ ./yii backup/console/restore `
backup_id is identifier of backup stored in sqlite database
By default, rest controller takes place on the route /backup/api.
To get access to it, add header Backup-Auth-Token to request with one of the tokens stored in application config in the module section
(param authTokens);
GET /backup/api/index
This is useful to remote backup checks from some dashboard with a few projects.
Response example:
`json
[
{
"id": 8,
"date": "2019-11-11 07:02:23",
"status": 1,
"type": 1,
"config_id": "main_storage",
"config_name": "TMP folder",
"filename": "main_storage_2019-11-11_07-02-23.zip",
"size": 4183
}, {
"id": 7,
"date": "2019-11-11 06:56:36",
"status": 1,
"type": 0,
"config_id": "main_db",
"config_name": "Main database",
"filename": "main_db_2019-11-11_06-56-36.gz",
"size": 753
},
]
`
POST /backup/api/backup?config_id=<backup_config_id>
Succes respons example:
`json
{"result":"success"}
`
POST /backup/api/restore?id=<backup_id>
Succes respons example:
`json
{"result":"success"}
`
DELETE /backup/api/delete?id=<backup_id>
Succes respons example:
`json
{"result":"success"}
`
GET /backup/api/get?id=<backup_id>
This request will return backup archive with requested ID.


Embeds Calendly widgets into Yii2 applications
The preferred way to install this extension is through composer.
Either run
php composer.phar require --prefer-dist daxslab/yii2-calendly "*"
or add
"daxslab/yii2-calendly": "*"
to the require section of your composer.json file.
<?= \daxslab\calendly\Calendly::widget([
    'calendlyId' => Yii::$app->params['calendlyId'],
    'mode' => \daxslab\calendly\Calendly::MODE_INLINE,
]) ?>
The component will try to set some properties by default:
Proudly made by Daxslab.